Shortbread Stars

Christmas is just around the corner, which means we're super excited to try out as many delicious recipes as possible in the lead up to the big day! This week, we turned to one of our favourite baking bloggers, Kelly, who documents her delicious recipes over on her blog, This Sweet.

Shortbread is a classic recipe, and one that's perfectly suited for entertaining your friends and family at Christmas, especially in this sweet and festive star shape! If you're looking to try a twist on the classic biscuit, or you'd like to offer a choice of flavours to sample, Kelly also has a yummy chocolate and cherry alternative that you can try out too!

While the perfect technique may take an attempt or two to master, these biscuits have a very simple ingredient list, and would be a great way to keep little hands busy on Christmas Eve (while also providing a tasty treat for Santa).

To see the full details of Kelly's shortbread recipe, click here!

Products You May Find Helpful

Enamel Baking Tray
£14.15 inc V.A.T.
Biscuit Baking Tray
£9.95 inc V.A.T.
Large Cooling Rack
£3.60 inc V.A.T.


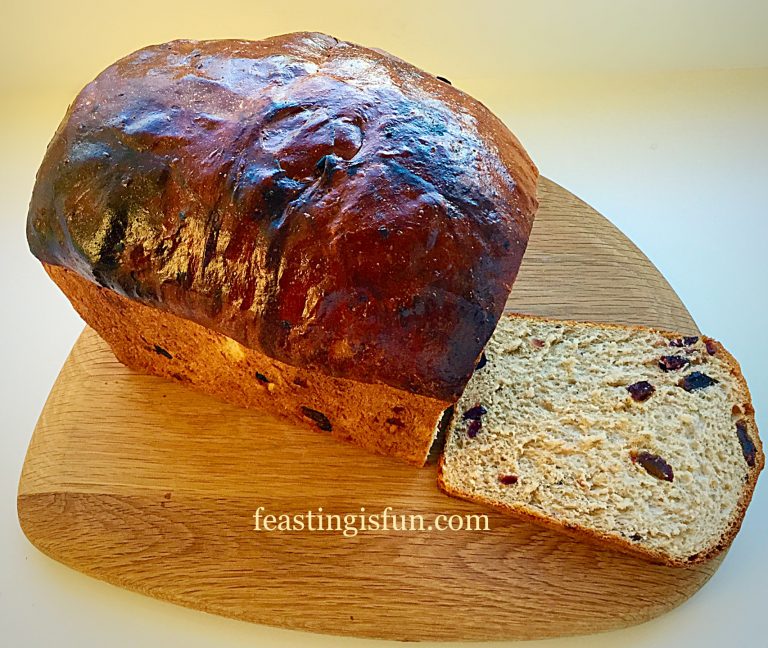
Christmas Spiced Fruit Loaf

December is just around the corner, which makes it the perfect time to start testing your Christmas baking skills, with a winter warmer recipe that's sure to fill your home with a gloriously festive aroma. To help you do just that, our featured recipe for this week is this Christmas Spiced Fruit Loaf, created by Sammie over at Feasting is Fun

Here at British Bakeware, we always look forward to seeing what delicious creations Sammie will be whipping up next, and luckily for us, the feeling is mutual. Sammie loves using our 3lb Farmouse Loaf Tin to bake savoury and sweet creations over on her blog, and this latest spiced loaf is sure to be a real treat for those who try it!

Filled with dried fruits and Christmas spices, this brioche style loaf is a treat for all the senses, from it's mouth-watering taste to its soft crumb texture!


To find out how to make this festive loaf as a pre-Christmas treat, or as your Christmas morning breakfast, check out the full details for Sammie's recipe here

Ingredients:

  • 2 large, free range eggs
  • Approx 320mls of whole milk 
  • 1tsp caster sugar
  • 7g of easy bake dried yeast
  • 500g/1lb/2oz strong 
  • 50g/2oz unsalted butter - at room temp and cut into cubes (plus extra for greasing) 
  • 7g salt
  • 1tsp vanilla bean paste
  • 2tsp ground ginger
  • 1tsp ground ginger
  • 1tsp freshly grated nutmeg
  • 1/2tsp allspice
  • 100g/4oz medjool dates
  • 100g/4oz dried cranberries
  • 50g/2oz glacé cherries&nbsp
  • 1 egg whisked with a teaspoon of water for egg wash

Step 1 - Measure out 320mls of milk into a microwavable jug, and zap on full power for 20 secs. Stir and check the temperature, which should be at body temperature. If it is a little too warm, leave to one side to cool.

Step 2 - Into the slightly warmed milk, add 2 whole eggs, which should create a total volume of 350 mls. Tip away an excess milk.

Step 3 - Pour the milk and eggs into the large bowl of a stand mixer.

Step 4 - Next add the sugar a yeast, before stirring with a spoon to break up the eggs and mix the ingredients.

Step 5 -  Now add the flour on top of the liquid ingredients. This forms a barrier so that the yeast does not come into contact with the salt.

Step 6 - Add the salt and cubes of butter.

Step 7 - Fit the dough hook, and mix on a slow speed for 10 mins.

Step 8 - While this is mixing, prep the fruit. Remove the stones from the dates and cut in half, before cutting each half into 4 pieces. Cut the cherries into quarters, before placing the cherries, dates and cranberries in a bowl together.

Step 9 - After 10 mins, stop the mixer  and lift the dough hook, and stretch a small piece of dough. It is properly kneaded when it can stretch without tearing, thinly enough to see light through it.

Step 10 - If the dough tears, lower the hook, and continue mixing for a further 2 minutes, after which test it again.

Step 11 - Once the dough passes the test, add the fruit and spices, before lowering the hook, and mixing on a low speed for a further 2 mins.

Step 12 - After the fruit is incorporated, stop the mixer and lift the dough hook.

Step 13 - Use clean hands to crape out the dough and place it into a bowl.

Step 14 - Cover the bowl with a clean tea towel, and place it somewhere warm, and away from drafts. Leave to double in size.

Step 15 - Due to the spices, the action of the yeast may slow, so this could take up to 2hrs or more.

Step 16 - While proving, thoroughly grease your loaf tin with butter.

Step 17 - Once the dough is ready, scrape onto a lightly floured surface.

Step 18 - Press the dough into a rough rectangular shape, folding the bottom third up, and the top third down, so that it slightly overlaps the previous fold.

Step 19 - Finally, tuck either side under, leaving you with an oval-ish shape. Place into the loaf tin, and cover with the tea towel again leaving to double in size once more.

Step 20 - While the dough is proving, preheat the over to 240C/22C fan, gas mark 8.

Step 21 - Once dough is ready, remove the towel and prush over the egg wash, using a pastry brush.

Step 22 - Place into the centre of a preheated oven, and bake for ten mins, before reducing to 220C/200C fan. Continue to bake for 20 mins.

Step 23 - Turn the loaf out onto a cooling rack, and rap the base of the loaf with your knuckle. The bread is baked if it produces a hollow sound. If not, place back into the oven, and check every 5 mins until baked.


Products You May Find Helpful

3lb Farmhouse Loaf Tin
£10.99 inc V.A.T.
Small Cooling Rack
£3.24 inc V.A.T.
Large Cooling Rack
£3.60 inc V.A.T.


Spiced Pumpkin Brownies

Thursday marks the annual holiday of Thanksgiving for our friends across the pond, which means that they get an extra day of festivities and food ahead of Christmas (we're not jealous, honestly). To celebrate, we wanted to include a featured recipe that would act as nod to the traditional Thanksgiving menu, while also bringing a fresh twist to the festive flavours associated with the holiday.

For this reason, we decided to feature this delicious Spiced Pumpkin Brownies recipe, created by Ruth over at Nutritiously Naughty. These little squares of deliciousness are a perfect alternative to your typical pumpkin pie, and put a healthy spin on your average autumn/winter recipes. They are naturally free from dairy, gluten and refined sugar, while also being low fodmap, making them perfect for those of you with sensitive tummies!

To see more of Ruth's comforting and delectable pumpkin recipes, Click Here

Ingredients:

  • 200g pumpkin 
  • 100g coconut oil (melted)
  • 50g gluten free oat flour 
  • 30g vegan vanilla protein powder (or 25g extra oat flour & 1/2 tsp vanilla extract)
  • 1 tsp ground cinnamon 
  • 1/2 tsp ground ginger
  • 1/4 tsp grated nutmeg
  • 50ml unsweetened almond milk
  • 50 ml maple (20ml more if you like them sweeter)
  • 2 eggs
  • 70g cacao powder

Step 1 - Peel the pumpkin and cut into 2cm chunks, then steam for 7-10 minutes until soft, and leave to cool. (If you can't find a fresh pumpkin, used tinned). 

Step 2 - Preheat the oven to 170°C, then line an 8x8 inch brownie tin with baking paper.

Step 3 - In a food processor combine everything except the cacao powder, until a smooth batter is formed.

Step 4 - Separate 50g of the batter into a bowl for the topping.

Step 5 - Add the cacao powder to the processor, and process once again until the mixture is combined.

Step 6 - Pour your batter into the lined brownie tin.

Step 7 - Drizzle little spoonfuls of the leftover pumpkin mixture on top of the brownie batter, then swirl around using a knife or skewer, to give your brownies a marble effect.

Step 8 - Put your mixture in the oven to bake for 15 minutes, until the mixture holds its shape, but is still a bit soft.

Step 9 - Leave to cool completely, before cutting into squares.


Click here to see the full selection of tasty, healthy and nutritious recipes from Nutritiously Naughty!


Products You May Find Helpful

8 Inch Square Cake Tin
£7.40 inc V.A.T.
Chocolate Brownie Tray
£5.50 inc V.A.T.
Large Cooling Rack
£3.60 inc V.A.T.
 

Brownie & Raspberry Cheesecake Squares

Summer is now nothing but a distant memory, and we've got many cold, wet and dreary days ahead of us. So, with that in mind, if you're looking for something to brighten up your day, then this week's featured recipe is perfect for you! It'll have you feeling all warm and cosy in no time.

This week's recipe is from the terrific Becky's Biscuit Bases. It's a bit different from your regular cheesecake; as instead of featuring a biscuit base, it features a brownie base! Here at British Bakeware we're strong supporters of this combination, and we bet it tastes as good (if not better) as it sounds! This recipe is super easy to follow, and even a novice baker will be able to give this a go. 

If you wish to take a look at some recipe's that are similar to this Brownie & Raspberry Cheesecake Squares recipe, then we highly recommend that you head over to Becky's blog! Her blog features tons of fantastic cheesecake recipes that are really simple to follow and taste delicious!

Ingredients:

For the Brownie Base

  • 225g Plain Flour
  • 1/2 tsp of Baking Powder
  • 1/2 tsp of Salt
  • 400g of Caster Sugar
  • 225g of Unsalted Butter
  • 60g of Cocoa Powder
  • 1 tsp of Vanilla Extract
  • 4 Eggs

For the Filling

  • 250ml of Double Cream
  • 100g of Soft Cheese
  • 3 tbsp of Vanilla Extract
  • 1/2 Punnet of Raspberries

For Decoration 

  • 1/2 Punnet of Raspberries
  • 1/2 Punnet of Blueberries
  • Left Over Brownie

Method:

Step 1 - Preheat the oven to 180°C or gas mark 4.

Step 2 - Line your loose bottom square tin and small loaf tin.

Step 3 - Mix the flour, baking powder and salt together in a large mixing bowl, and set aside.

Step 4 - In a seperate bowl, beat the melted butter, sugar & cocoa powder together. Then pour in the vanilla extract and crack in the eggs. Then beat the mix together until it is well combined.

Step 5 - Once the mixture is well combined, add the flour mix you had made previously in parts, until it's fully combined.

Step 6 - Pour the majority of the brownie mixture into your square baking tin, but save some mix to go in your small loaf tin.

Step 7 - Pour the rest of the mix into your loaf tin. You'll chopping this up later for decoration, so it doesn't matter if it doesn't fully cover the base of your tin.

Step 8 - Place both tins in the oven. Remove the loaf tin after 10 - 15 mins and square tin after 25-30 mins. Leave the larger brownie to cool in the tin.

Step 9 - Once the brownies have cooled, you can begin to make the cheescake filling. Start by whipping the cream, using an electric whisk. Do this until it forms stiff peaks.

Step 10 - Next, fold in the soft cheese and icing sugar until the mixture is thoroughly combined.

Step 11 - Once it's combined, begin folding in the raspberries, but make sure you leave some for decoration. 

Step 12 -  Place the cheesecake brownies in the fridge for 3 hours or over night.

Step 13 - Once the cheesecake has set, remove the brownie from the fridge and cut into nine squares. Decorate with smaller chunks of brownies, raspberries and blueberries.

For a more detailed recipe, along with step-by-step photos to guide you, check out Becky's recipe here.

Products You May Find Helpful

8 Inch Square Cake Tin
£7.40 inc V.A.T.
450g Loaf Tin
£3.95 inc V.A.T.
Large Cooling Rack
£3.60 inc V.A.T.
 

There'll be a bittersweet feeling in the air tonight as we sit down to watch the grand final of The Great British Bake Off's seventh series. We're excited to find out who wins, but not only will this be our last Bake Off fix of 2016, it will also be the last episode ever of the show's current format. Next year, Bake Off is moving to Channel 4 and losing judge Mary Berry and hosts Sue Perkins and Mel Giedroyc in the process (although we're still kind of hoping that Mary, Mel and Sue will show up on a brand new BBC programme in 2017 called The Great British Cake Off).

Whatever's next for Bake Off, we want to give season seven the big send-off it deserves, and so we're launching one final bakeware giveaway before we wave goodbye. This week's prize is our biggest ever, designed to help you keep baking long after Bake Off has disappeared into hibernation for another year - one lucky winner will receive all of this:

If you fancy getting your hands on this haul, here's what you need to do...

How to Enter

(You'll need a Twitter account!)

  1. Follow @BakewareUK on Twitter.
  2. Retweet the competition tweet at the top of our Twitter page.
  3. Cross your fingers and keep your eyes peeled - we'll announce the winner at 12 noon on the 1st of November!

Good luck, and happy baking!

Click here to browse our full range of affordable, high-quality bakeware >